This is part 2 of 3 unit testing full stack javascript. In this post we’ll talk about testing some more of Angular: Services, Directives and Filters.
In case you missed it, this unit testing series of posts are:
Part 2A – Installation, Routes, Controllers
Part 2B – Services, Directives, Filters
Part 2C – Coverage Reports, End to End (e2e)
So let’s get started with where we left off, testing services.
Services
Testing services is actually fairly straight forward. The thing to keep in mind is that you intercept all the requests that would normally go to a backend, and return the status code, etc. that you would expect.
|
1 2 3 4 5 6 7 8 9 10 11 12 13 14 15 16 17 18 19 20 21 22 23 24 25 26 27 28 29 30 31 32 33 34 35 36 37 38 39 40 41 42 43 44 45 46 47 48 49 50 51 52 53 54 55 56 |
describe('Unit: Services', function(){ beforeEach(module('app')); describe('todoService', function(){ var todoService; var $httpBackend; var baseUrl = "http://localhost:3000"; beforeEach(inject(function($injector, _$httpBackend_){ todoService = $injector.get('todoService'); $httpBackend = _$httpBackend_; })); it('should have todoService as a service.', function(){ expect(todoService).toBeDefined(); }); it('should get all todos', function(){ $httpBackend.expectGET(baseUrl + '/todo') .respond(200, 'todo API'); todoService.get(); $httpBackend.flush(); }); it('should get one todo', function(){ $httpBackend.expectGET(baseUrl + '/todo/1') .respond(200, 'todo API'); todoService.get(1); $httpBackend.flush(); }); it('should update a todo item', function(){ $httpBackend.expectPUT(baseUrl + '/todo') .respond(200, 'todo API'); todoService.update({title: 'My Todo', description: 'Another Todo Update.'}); $httpBackend.flush(); }); it('should delete a todo item', function(){ $httpBackend.expectDELETE(baseUrl + '/todo/1') .respond(200, 'todo API'); todoService.delete(1); $httpBackend.flush(); }); }); }); |
Let’s break down one of the unit tests:
|
1 2 3 4 5 6 7 8 9 |
it('should get all todos', function(){ $httpBackend.expectGET(baseUrl + '/todo') .respond(200, 'todo API'); todoService.get(); $httpBackend.flush(); }); |
As you can see the $httpBackend is where we describe the type of http call that the service will attempt to do, and we setup how to return back to the service. You can send data to the $httpBackend, having it expect a certain set of data, or have it return specific data to further test the directive. The link to the Angular Site for $httpBackend will help you read about the different ways to utilize it.
Once we call $httpBackend.flush() we flush all pending requests and respond with the pre-determined responses.
Moving further, you can obviously test any of the functions inside of a service quite easily. Services I would say are one of the easier components to test in Angular.
Directives
I thought that directives were actually one of the components in Angular that I had the hardest time trying to figure out how to properly test all the aspects of. It seems that most people never get into actually testing all of the pieces of them.
Let’s just get into it: isolate scopes are in the vast majority of directives, and most places that show you how to test directives, don’t really specify how to test those.
I’m here to hopefully clear that up. Lets look at en example directive and it’s corresponding code.:

|
1 2 3 4 5 6 7 8 9 10 11 12 13 14 15 16 17 18 19 20 21 22 23 24 25 26 27 28 29 30 31 32 33 34 35 36 37 38 39 40 41 42 43 44 45 46 47 48 49 50 51 |
(function(){ 'use strict'; var directiveId = "todoItem"; angular.module('app.directives').directive(directiveId, ['todoService', todoItem]); function todoItem(todoService){ return { restrict: 'E', scope: { todo: '=', refreshFn: '&' }, templateUrl: 'js/directives/todoItem/todoItem.html', link: function(scope, element, attr){ scope.editing = false; scope.deleteItem = function(){ todoService.delete(scope.todo._id).then( function(success){ scope.refreshFn(); }, function(error){ }); } scope.updateItem = function(){ todoService.update(scope.todo).then( function(success){ scope.refreshFn(); }, function(error){ }); } scope.editItem = function(){ scope.editing = true; } scope.cancelUpdate = function(){ scope.editing = false; } } } } }()); |
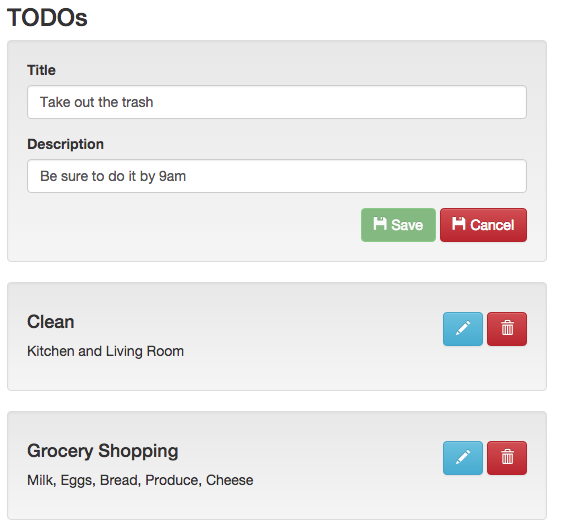
When the user clicks edit, it sets $scope.editing flag to true, and gives them this view:
So with that in mind, let’s make a directive unit test that allows us to test those isolate scope functions, check the variables on it, and do a save to the API (intercepted with Mocks), and attempt to do things that give back errors and allow us to accommodate for that.
|
1 2 3 4 5 6 7 8 9 10 11 12 13 14 15 16 17 18 19 20 21 22 23 24 25 26 27 28 29 30 31 32 33 34 35 36 37 38 39 40 41 42 43 44 45 46 47 48 49 50 51 52 53 54 55 56 57 58 59 60 61 62 63 64 65 66 67 68 69 70 71 72 73 74 75 76 77 78 79 80 81 82 83 84 85 86 87 88 89 90 91 92 93 94 95 96 97 98 99 100 101 102 103 104 105 106 107 108 109 110 111 112 113 114 115 116 117 118 119 120 121 122 123 124 125 126 127 128 129 130 131 132 133 134 135 136 137 138 139 140 141 142 143 144 145 146 147 148 149 150 151 152 153 154 155 156 157 158 159 |
describe('Unit: Directives', function(){ var elem, scope, $compile, $httpBackend, baseUrl = "http://localhost:3000"; beforeEach(module('app')); beforeEach(module('app.directives')); /* Directive Templates */ beforeEach(module('js/directives/todoItem/todoItem.html')); beforeEach(inject(function($rootScope, _$compile_, _$httpBackend_){ scope = $rootScope.$new(); $compile = _$compile_; $httpBackend = _$httpBackend_; })); describe('todoItem', function(){ var directiveStr; beforeEach(function(){ var todo = { title: "Todo Title", description: "Todo Description" } var refreshFn = function(){ return "Todo Refresh Fn. Call"; } scope.todo = todo; scope.refreshFn = refreshFn; scope.editing = false; directiveStr = "<todo-item todo='todo' refresh-fn='refreshFn()'></todo-item>"; }); it('should have a title and description', function(){ elem = $compile(directiveStr)(scope); scope.$digest(); var elemAsHtml = elem.html(); expect(elemAsHtml).toContain(scope.todo.title); expect(elemAsHtml).toContain(scope.todo.description); }); it('should execute the refreshFn scope function', function(){ elem = $compile(directiveStr)(scope); scope.$digest(); var elemAsHtml = elem.html(); expect(elemAsHtml).toContain(scope.todo.title); expect(elemAsHtml).toContain(scope.todo.description); }); it('should set the scope edit item to true', function(){ elem = $compile(directiveStr)(scope); scope.$digest(); var elemScope = elem.isolateScope(); elemScope.editItem(); expect(elemScope.editing).toBeTruthy(); }); it('should set the scope edit item to false', function(){ elem = $compile(directiveStr)(scope); scope.$digest(); var elemScope = elem.isolateScope(); elemScope.editItem(); elemScope.cancelUpdate(); expect(elemScope.editing).toBeFalsy(); }); it('should update the todo item', function(){ $httpBackend.expectPUT(baseUrl + '/todo') .respond(200, 'todo API'); scope.todo._id = 1; elem = $compile(directiveStr)(scope); scope.$digest(); var elemScope = elem.isolateScope(); elemScope.updateItem(); $httpBackend.flush(); }); it('should throw an error when trying to update the todo item', function(){ $httpBackend.expectPUT(baseUrl + '/todo') .respond(400, 'todo API'); scope.todo._id = 0; elem = $compile(directiveStr)(scope); scope.$digest(); var elemScope = elem.isolateScope(); elemScope.updateItem(); $httpBackend.flush(); }); it('should delete the todo item', function(){ $httpBackend.expectDELETE(baseUrl + '/todo/1') .respond(200, 'todo API'); scope.todo._id = 1; elem = $compile(directiveStr)(scope); scope.$digest(); var elemScope = elem.isolateScope(); elemScope.deleteItem(); $httpBackend.flush(); }); it('should throw an error when trying to delete the todo item', function(){ $httpBackend.expectDELETE(baseUrl + '/todo/0') .respond(400, 'todo API'); scope.todo._id = 0; elem = $compile(directiveStr)(scope); scope.$digest(); var elemScope = elem.isolateScope(); elemScope.deleteItem(); $httpBackend.flush(); }); }); }); |
That’s quite a long set of unit tests, well, 8 of them to be exact.
Do you remember when we setup the testing in Karma, we added the html2js pre-processor? That’s what allows us to load the html template file in the unit test with this piece of code:
|
1 |
beforeEach(module('js/directives/todoItem/todoItem.html')); |
To test any bits and pieces of the isolate scope, you need to do this:
|
1 2 3 4 5 6 7 8 9 10 11 |
it('should set the scope edit item to true', function(){ elem = $compile(directiveStr)(scope); scope.$digest(); var elemScope = elem.isolateScope(); elemScope.editItem(); expect(elemScope.editing).toBeTruthy(); }); |
We need to call elem.isolateScope() on the compiled element, digest the scope, so that we get updated and bound scope items. Now with the elemScope variable that’s returned from calling elem.isolateScope() we can access any of the isolate scope items, functions, etc. as you can see here with the call to elemScope.editItem() .
Everything else is pretty typical standard stuff relating to testing of services with $httpBackend and doing a flush() to validate that the api call is being made and to test different return scenarios (http status codes).
Filters
Testing filters is really quite simple. You would basically invoke them as you would in a controller, testing the return results. Here’s an example:
|
1 2 3 4 5 6 7 8 9 10 11 12 13 14 |
describe('Unit: Filters', function(){ var filter; beforeEach(module('app')); beforeEach(inject(function($filter){ filter = $filter; })); it('should filter a number and give it two decimals', function(){ var num = filter('number')(100, 2); expect(num).toEqual("100.00"); }); }); |
So that takes care of our 2nd part for testing Angular JS. Please let me know if you have further questions, so that I can enhance the post for others to learn from.
Our final post on Angular testing we’ll discuss coverage reports and End-to-End testing with Protractor.